How to paint a piano.
photo credit: Henry Cromett
When people see my brightly colored piano sitting in Director Park, Portland, I almost always get the same question: “How do you paint a piano?”
It’s a fair question. A piano is not your everyday canvas — it’s equal parts musical instrument, architectural object, and sculptural presence in a space. Tackling one is both exhilarating and a little intimidating. But here’s how I did it, step by step, with a lot of sponges, color, and perseverance.
Sign up for my newsletter for sneak previews on projects like this as they're in development, as well as fresh insider deals on Gabrialice creations.
Step 1: Dream Up the Concept
For Piano Push Play’s 2025 summer season, I was so thrilled to be chosen as one of the piano artists. Painting for Piano Push Play has been a longtime wish, and tackling a 3-D mural surface gave me a beautiful challenge.
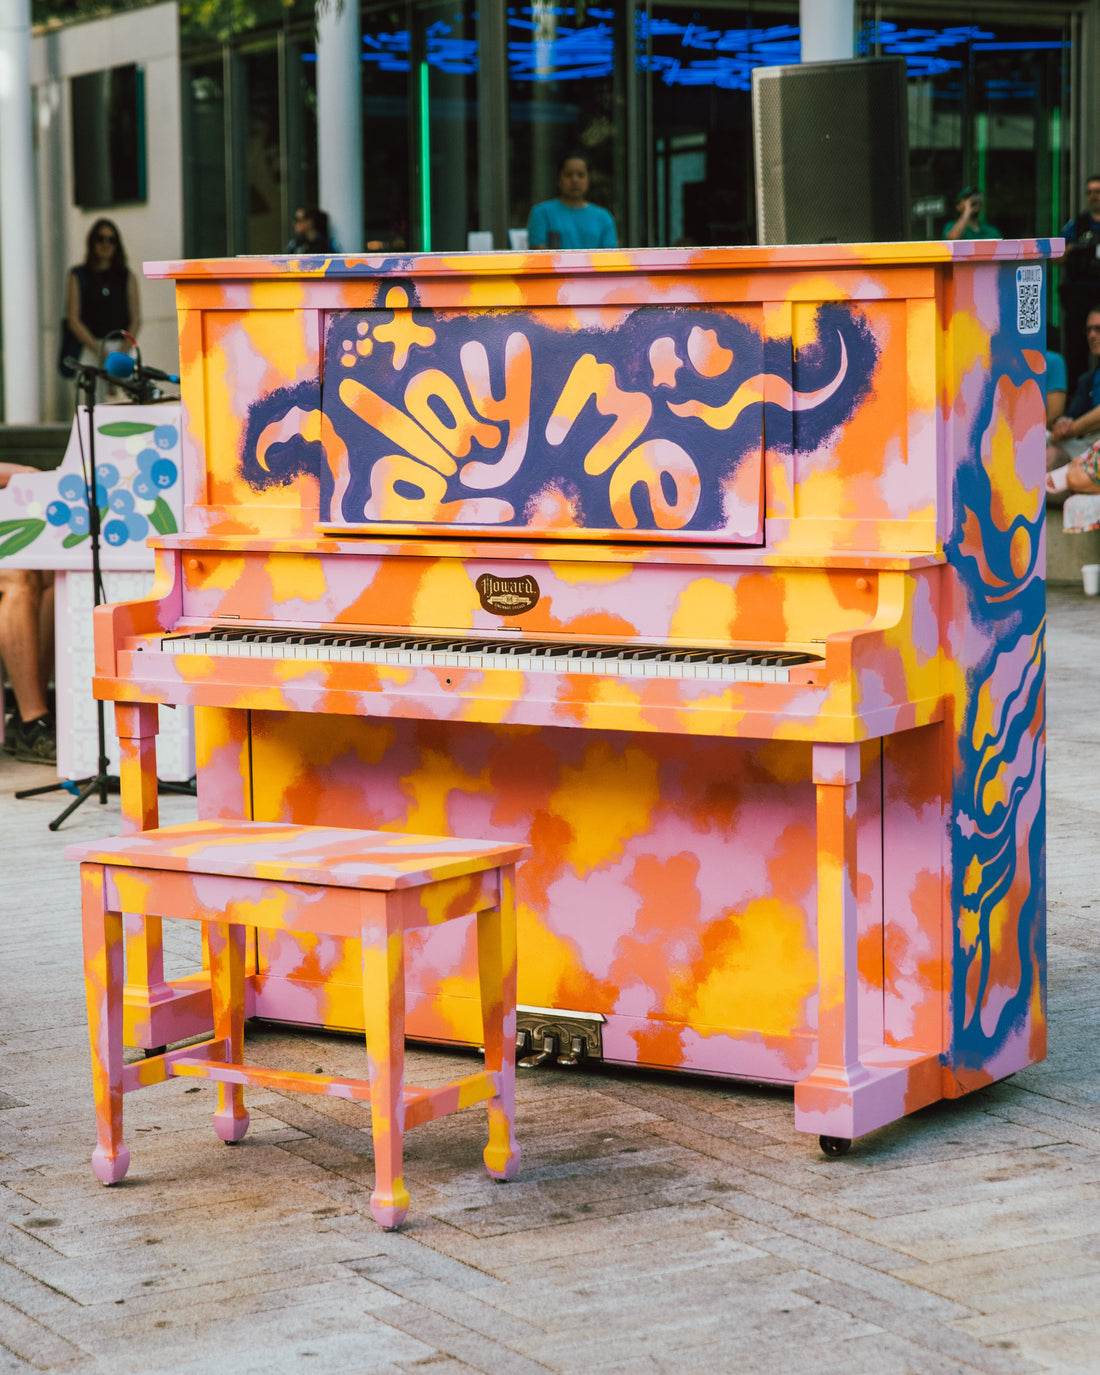
I wanted a design that felt joyful, vibrant, with a dash of sass. The concept I landed on — Nice Noise — grew from a simple urge: use color and sound to nudge us toward kinder conversations. We’re all moving fast; sometimes we forget to ask even the basic “How are you—really?” Be nice. Its bright, overlapping planes echo voices layered in community—questions, laughter, stories, music. It also recommends we make noise. I calculatingly chose this phrase to remind us our voices, pianos, all our instruments are powerful. Please sit, ask, play, listen, repeat.
My design used six very bold shades: soft purple, puffy pink, sunshine yellow, rust, and two shades of purpley indigo to top it off. Think “sunset meets candy shop,” but with a Portland flair.
Step 2: Prep Like a Pro
This Howard upright piano is an antique, originally thought to be midcentury however after further research I’m beginning to think it might be an earlier model Featured right on the front is a beautiful gold painted logo: “Howard - Cabinet Grand - Cincinnati. Chicago.” If you happen to know what year piano looks like, would you let me know in the comments?
Pianos of this era often have finishes that are delicate or already showing their years. You can’t just attack them with a sander the way you would a new wood panel.
I had to be careful — gentle hand sanding in some areas, avoiding damaging the veneer or thin detailing. The goal isn’t to strip the instrument down, but simply to create enough tooth for the paint to cling.
Then came taping off the keys and pedals (because no one wants crunchy, sticky notes), and laying out drop cloths to protect the space. Even before the first brushstroke, the prep work was already a workout and along with the next step: Priming, took almost the whole first week.
Step 3: Prime Everything
Before the fun colors could come out, the piano needed a good foundation. Enter: primer. The fun part: Pianos aren’t smooth canvases. They’ve got legs, lids, corners, and curves.
So here was no small feat — every surface, every curve, every little leg and lid had to be coated. It’s what ensures the paint won’t just sit on top of the glossy surface but will actually bond and last through Portland’s weather and all those busy hands.
It’s not glamorous, but watching the piano turn into a blank canvas is a strangely exciting moment. That fresh coat of white primer is like a reset button — suddenly, the piano is ready to transform. I must admit, I felt a sense of guilt, covering up the history that was that beautiful wood grain, but soon got entranced in my new color choices.
Step 4: Sponge & Blend
Once primed, it was time for color. I had so much fun picking out this range of robust outdoor acrylic paints in a satin finish from RoddaMiller in Portland, OR. I selected the colors right there in the Sandy Blvd store with their well-lit color wall (this is a huge compliment coming from an ex lighting designer). Over a good half hour, I held each swatch up to the next and carefully narrowed down my favorites to capture this project’s vibe, considering the trifecta: hue, value, and saturation. I landed on:
- Blossoms in Spring
- Cherished One
- Sari
- Bright Bubble
- Medieval
- Altar of Heaven
Instead of only using brushes, I reached for sponges. Why? Because they let me create those soft feathered blends where purple melts into pink, reddish slides into yellow. The texture from sponging gives the surface a dreamy, cloud-like quality — exactly the playful atmosphere I was aiming for. Unknowingly I was channeling the truffula tree factor (IYKYK) which made me giggle through the remainder of the process.
In my Instagram reels, you can see me working upside down at times to reach awkward angles. A piano is essentially a 360-degree mural, so every nook and cranny constitutes its own choreography.
Step 5: Layer to Your Heart’s Content
After the base colors were down, I went back in to brighten, smooth and balance. Each layer added more energy until the whole instrument hummed with color. This was when the piano started to feel alive — not just an object, but a character. It felt so fluffy with the sponged cloud effect and that made me exponentially giddy.
With brushes I added the purple-blues of Medieval and Altar of Heaven. I started with the lettering on the back “be nice” and “make noise”. I added wavy wobbly botanicals, with a heavy infusion of underwater movement. I used the lighter of the top colors for the back area.
On the front reads “play me” in the darkest color, harkening back to Piano Push Play’s motto often worded “Please Play Me” painted on the majority of the pianos for the project.
Step 6: Step Back & Trust the Process
One of the biggest lessons of painting something this large: you can’t always see it all at once. I had to trust that my choices up close — each sponge dab, each gradient — would add up to something cohesive when viewed across the park. Spoiler: it worked.
Step 7: Let the Music Flow
The final step? Hand it over to the community. Piano Push Play’s magic is that anyone can sit down and play. From a child working out their first scale to a seasoned pianist filling Director Park with Chopin, the painted piano is alive because of the people who touch it.
If you happen to be in Portland, through the end of summer, won’t you please go visit it and the other pianos [piano map] before they get placed in their lucky indoor spots? Be sure to tag me in your pics @gabri.alice.art , I want to know everything about your experience.
Why Paint a Piano?
Because music and color belong together. Because art should spill into our everyday spaces. Because sometimes the best way to spread love is to turn a beast of a musical sculpture into a rainbow party and leave it out in the city for strangers to discover.
Want to see behind-the-scenes videos of the process? Follow me on Instagram — I’ve been sharing time-lapses, paint progress, and even a cameo from a big orange tabby cat who helped supervise my work.
Sign up for my newsletter for insider information on all our current projects.